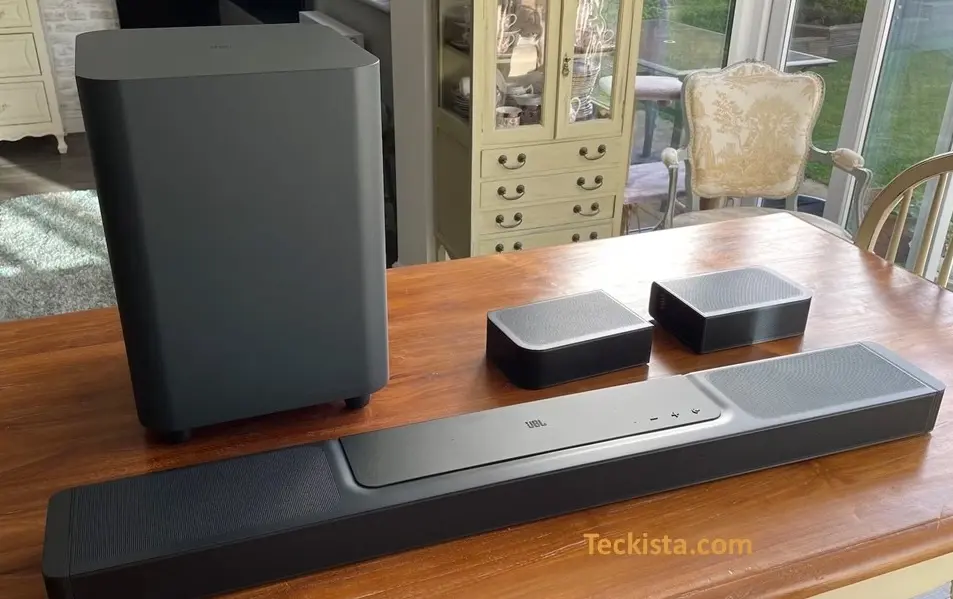
Setting up the JBL Bar 1300X involves connecting the soundbar and subwoofer to power, positioning the detachable rear speakers, connecting your TV through HDMI eARC/ARC, adding the soundbar to WiFi, and running room calibration. In this guide, we’ll show you how to set up JBL Bar 1300X step by step, including TV connection, WiFi setup, speaker pairing, calibration, and troubleshooting.
JBL Bar 1300X Setup at a Glance
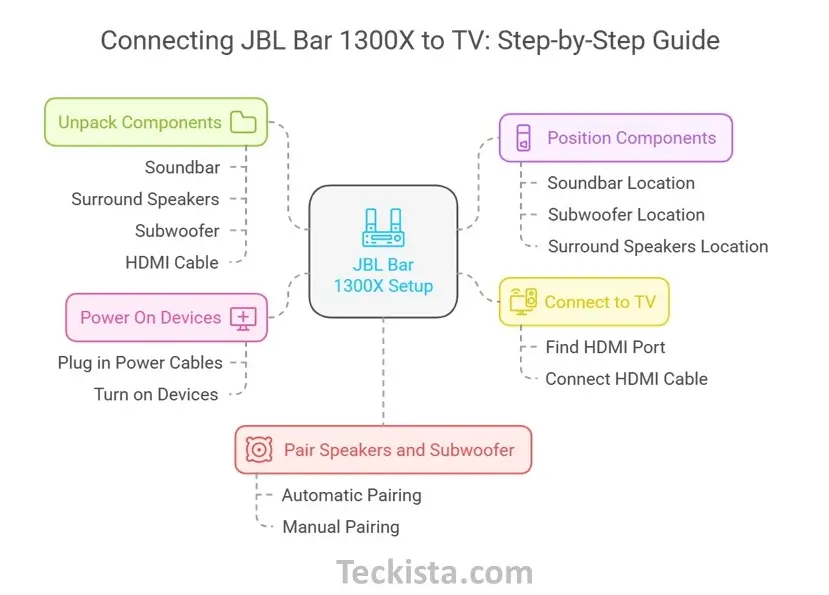
- Step 1 – Position the Speakers: Place the soundbar below your TV, the subwoofer on the floor, and the detachable rear speakers behind or beside your listening position.
- Step 2 – Connect the Power: Connect the soundbar and wireless subwoofer to power outlets.
- Step 3 – Prepare the Rear Speakers: Dock the detachable surround speakers with the main soundbar so they can connect and charge before use.
- Step 4 – Connect to Your TV: Use HDMI eARC/ARC for the recommended TV connection and Dolby Atmos support with compatible content and equipment.
- Step 5 – Set Up the JBL One App: Download the JBL One app on your Android or iOS device and add your JBL Bar 1300X.
- Step 6 – Connect to WiFi: Follow the JBL One app instructions to connect the soundbar to your home WiFi network.
- Step 7 – Run Room Calibration: Position the detachable rear speakers where you’ll use them and run the sound calibration process to optimize the system for your room.
- Step 8 – Test the System: Play TV or movie content and confirm that the soundbar, subwoofer, and rear speakers are working correctly before fine-tuning the bass and surround levels.
How to Set Up JBL Bar 1300X Step by Step
Setting up the JBL Bar 1300X takes about 10–15 minutes if you have your TV, Wi-Fi, and all the included accessories ready. For the best Dolby Atmos performance, connect the soundbar through HDMI eARC, place the detachable rear speakers correctly, and complete JBL’s two-step sound calibration.
Step 1: Unbox and Check What’s Included
Before starting, make sure all the essential components are in the box.
You should have:
- JBL Bar 1300X main soundbar
- Two detachable wireless surround speakers
- Wireless subwoofer
- Remote control with batteries
- HDMI cable
- Power cables
- Wall-mount accessories (optional)
- Quick Start Guide
If anything is missing, complete the setup only after replacing the missing accessory.


Step 2: Position the Soundbar, Subwoofer, and Rear Speakers
Correct placement makes a noticeable difference to Dolby Atmos and surround performance.
Soundbar
- Place it directly below your TV.
- Keep the front grille unobstructed.
- Leave enough clearance above the soundbar so the up-firing Atmos drivers can reflect sound from the ceiling.
Subwoofer
- Place it on the floor near the front of the room.
- Leave a little space around it.
- Avoid pushing it tightly into a corner if the bass becomes too boomy.
Detachable Rear Speakers
- During the initial setup, keep them docked on both ends of the soundbar.
- After setup, place them behind or beside your seating position for true surround sound. They can also work as standalone Bluetooth speakers when detached.


Step 3: Connect JBL Bar 1300X to TV
For the best audio quality, use the included HDMI cable.
Recommended Connection
- Locate the HDMI eARC/ARC port on your TV.
- Connect the HDMI cable from HDMI OUT (TV eARC/ARC) on the JBL Bar 1300X.
- Plug the other end into your TV’s HDMI eARC or ARC port.
- Turn on both devices.
The soundbar should automatically detect the TV connection.
Which Connection Should You Use?
| Connection | Recommendation | Best For |
|---|---|---|
| HDMI eARC | ⭐ Best | Dolby Atmos and highest-quality TV audio |
| HDMI ARC | Recommended | TVs without eARC |
| Optical | Backup option | Older TVs |
| Bluetooth | Optional | Music from phones |
| Wi-Fi | Recommended | Streaming and app features |
HDMI eARC is preferable because it supports higher-bandwidth audio formats and makes it easier to use compatible Dolby Atmos sources. If your TV doesn’t support eARC, HDMI ARC can still be used.
The JBL Bar 1300X includes three additional HDMI inputs, allowing compatible consoles and media players to pass through 4K Dolby Vision while still sending high-quality audio to the soundbar.


Step 4: Power On the Soundbar and Subwoofer
Once everything is connected:
- Plug the soundbar into power.
- Plug the wireless subwoofer into power.
- Turn on your TV.
- Turn on the soundbar.
The subwoofer normally pairs with the soundbar automatically after startup.
Step 5: Connect the Detachable Rear Speakers and Subwoofer
One of the biggest advantages of the JBL Bar 1300X is its detachable wireless surround speakers.
Rear Speakers
- Leave both speakers attached to the soundbar during the first setup.
- They automatically charge while docked.
- If they don’t reconnect later, dock them back onto the soundbar to re-establish the wireless connection.
Subwoofer
The wireless subwoofer usually connects automatically after powering on.
If it doesn’t connect, use JBL’s manual pairing procedure from the owner’s guide.
Step 6: Connect JBL Bar 1300X to Wi-Fi
Connecting to Wi-Fi unlocks software updates, streaming services, Chromecast built-in, AirPlay, and additional soundbar settings.
Here’s how:
- Download the JBL One app on Android or iPhone.
- Connect your phone to your home Wi-Fi.
- Open the JBL One app.
- Select Add Device.
- Choose JBL Bar 1300X.
- Follow the on-screen instructions to connect it to your Wi-Fi network.
Once connected, the app lets you:
- update firmware,
- adjust EQ,
- manage streaming services,
- customize sound settings.


Step 7: Run JBL’s Two-Step Sound Calibration
This is the step many users skip—but it’s one of the most important.
JBL Bar 1300X calibration process uses two separate calibration passes to optimize surround performance for your room.
First Calibration
- Place both detachable speakers beside your seating position.
- Press CALIBR on the remote.
- Follow the countdown and allow the first calibration to finish.
Second Calibration
- Move the detachable speakers to their final rear positions.
- Press CALIBR again.
- Let the second calibration complete.
This process helps the soundbar optimize:
- Dolby Atmos height effects
- surround accuracy
- speaker timing
- room-specific acoustics.
Step 8: Test the System
Before changing EQ settings, confirm everything works correctly.
Quick Checklist
- TV audio plays through the soundbar.
- Subwoofer produces bass.
- Rear speakers are connected.
- Dolby Atmos content plays correctly (when supported).
- Wi-Fi appears in the JBL One app.
Once this checklist is complete, your JBL Bar 1300X setup is finished. You can then fine-tune bass, surround levels, and height effects inside the JBL One app to match your room and listening preferences.
How to Reset JBL Bar 1300X
If your soundbar isn’t functioning properly or you want to restore it to factory settings, resetting it can help.
Step 1: Locate the Necessary Buttons: Find the source button and the volume up (+) and volume down (-) buttons.
Step 2: Perform the Reset: Press and hold the source button and both volume buttons at the same time for about 5-10 seconds. The soundbar will display a reset message and restart automatically.
Once it powers back on, you will need to reconnect it to your TV and WiFi network.
Best JBL Bar 1300X Settings After Setup
Once your JBL Bar 1300X is connected and calibrated, you can fine-tune a few settings to better match your room, content, and listening preferences. The most useful adjustments are bass level, surround level, and rear-speaker placement.
Adjust the Bass Level
The JBL Bar 1300X provides five bass levels (LVL1–LVL5), with LVL3 providing a balanced starting point for most rooms.
| Bass Level | Best For |
|---|---|
| LVL1–LVL2 | Small rooms, apartments, late-night viewing, or reducing boomy bass |
| LVL3 | Balanced everyday TV, movies, gaming, and music |
| LVL4–LVL5 | Larger rooms, action movies, and stronger bass impact |
If dialogue becomes difficult to hear during action scenes, lower the bass by one level. If bass feels weak, experiment with the subwoofer position before immediately increasing it to LVL5.
Adjust the Rear & Surround Level
When the detachable rear speakers are undocked, you can adjust their surround output between LOW, MID, HIGH, and MUTE.
| Surround Level | Best For |
|---|---|
| LOW | Rear speakers positioned close to the seating area |
| MID | Best starting point for most movies, TV shows, music, and gaming |
| HIGH | Larger rooms or rear speakers positioned farther from the listener |
| MUTE | Listening through the main soundbar and subwoofer without rear effects |
Start with MID rather than automatically selecting HIGH. If rear effects become distracting or overpower dialogue from the screen, reduce the surround level.
Fine-Tune Rear-Speaker Placement
After calibration, small placement changes can still help you achieve a more natural surround effect.
- Move the rear speakers slightly farther apart for a wider surround field.
- Position them slightly behind the listening area for stronger rear effects.
- Raise them if a sofa or other furniture blocks the drivers.
- Keep the left and right speakers at roughly similar heights.
- Avoid placing the speakers inside cabinets or directly behind large furniture.
If you make a major change to their location, run room calibration again.
Recommended Settings by Content
| Use Case | Bass | Surround | Recommended Approach |
|---|---|---|---|
| Movies | LVL3–LVL4 | MID–HIGH | Stronger bass and surround for cinematic effects |
| TV & Dialogue | LVL2–LVL3 | LOW–MID | Keeps voices clear without excessive rear effects |
| Music | LVL3 | MID | Balanced bass with moderate room-filling sound |
| Gaming | LVL3–LVL4 | MID–HIGH | Helps emphasize effects and directional surround cues |
| Late-Night Viewing | LVL1–LVL2 | LOW | Reduces bass and aggressive surround effects |
These are starting points rather than fixed settings. Room size, speaker distance, listening volume, and personal preference can all affect which combination sounds best.
Keep the Firmware Updated
Check the JBL One app periodically for firmware updates. Updates may improve system stability, HDMI compatibility, wireless performance, or other soundbar functions.
Avoid disconnecting power while an update is being installed.
Best Starting Point
For most rooms, start with Bass LVL3 + Surround MID. Listen to familiar content before changing anything, then adjust one setting at a time.
If the bass is overwhelming, lower the bass level. If surround effects are weak, increase the surround level. If the rear speakers sound too dominant, reduce the surround setting rather than compensating by increasing the main volume.
Check out the complete JBL Bar 1300X Soundbar review here
JBL Bar 1300X Setup Problems and Fixes
| Problem | What to Check |
|---|---|
| No sound from TV | Confirm the HDMI cable is connected to the TV’s ARC/eARC port and check the TV audio-output settings. |
| Subwoofer not connecting | Restart the soundbar and subwoofer and check their wireless connection. |
| Rear speakers not connecting | Dock the detachable speakers on the soundbar and allow them to reconnect. |
| JBL One app can’t find soundbar | Check WiFi, restart the app, and confirm your phone is connected to the correct network. |
| Dolby Atmos not working | Check the HDMI connection, TV audio settings, source device, streaming service and content compatibility. |
| Weak surround effect | Run room calibration and check the position and surround level of the detachable speakers. |
| Soundbar still won’t work correctly | Restart the system; use a factory reset only if normal troubleshooting fails. |
Final Thoughts
Once your JBL Bar 1300X is connected through HDMI eARC/ARC, added to WiFi, paired with its subwoofer and detachable speakers, and properly calibrated, the basic setup is complete. Before changing EQ or surround levels significantly, test a few movies and music tracks and make small adjustments based on your room and listening position.
How do I connect the JBL Bar 1300X to my TV?
Connect HDMI OUT (TV eARC/ARC) on the soundbar to your TV’s HDMI eARC/ARC port. Select the soundbar as your TV’s audio output. HDMI eARC is recommended for Dolby Atmos.
How do I connect the JBL Bar 1300X to Wi-Fi?
Open the JBL One app, add the JBL Bar 1300X, and follow the instructions to connect it to your home Wi-Fi network.
How do I calibrate the JBL Bar 1300X?
Position the detachable rear speakers as instructed and press CALIBR on the remote. Follow the prompts and complete both calibration stages for the best surround performance.
Why are my rear speakers or subwoofer not connecting?
Make sure the subwoofer has power and the rear speakers are charged. Dock the rear speakers to the soundbar to reconnect them. Restart the system if the problem continues.
Why is Dolby Atmos not working on my JBL Bar 1300X?
Use HDMI eARC/ARC and make sure your TV, source device, streaming service, and content support Dolby Atmos. Select Passthrough, Bitstream, or Auto in your TV audio settings where available.